Deploying Juniper vLWC on PVE
Intro
As with any critical infrastructure, technology vendors provide a “call-home” feature for their products. For more than a decade (at least to my knowledge), storage vendors like Hitachi or EMC would provide a solution that would allow the vendor to connect to systems you own for support/assistance departments to directly work on them instead of telling you on the phone what to do. Other expected functionality includes opening a proactive ticket on hardware failure, extract/upload logs or inventory installed base.
This call-home functionality is usually delivered as a piece of software running on a dedicated/physical appliance, as a software to be installed on a general purpose Operating System instance (Windows Server, SLES/RHEL/OEL/Debian) or, these days, a pre-packaged virtual appliance.
Implementing such functionality, is always a good thing to do as it allows the vendor support team to provide quicker response when there are failures.
The need
We were approached by the Juniper Support team, pitching for a WLC appliance which would provide call-home capabilities, and oversee our installed base. This appliance is part of their Juniper Support Insights (JSI) initiative.
One of such physical appliances is en route to one of our sites. Meanwhile, I’m overseeing a lab deployment that could benefit from the quick support and inventory capabilities. Further reviewing this topic, the Juniper team mentioned there’s a virtual version of the appliance that was recently released.
The formal documentation for vSphere environments is pretty straightforward and you can just follow that if you’re working on a supported environment. In my case, the support sidecart environment for the lab doesn’t sport VMware vSphere, but Proxmox VE.
I’ll deploy vLWC on Proxmox VE to oversee QFX switches managed by Apstra & EX switches which comprise the OOBM network for the QFX switches too.
Here be dragons.

As a word of warning, I should highlight the setup I’m about to execute and share with you is not supported by Juniper and your Service Manager will either frown on you, yell at you or just plainly ignore you (depending on the kind of relationship you have) if you ever request help deploying vLWC on KVM. In our case, I welcome Alejandro for the administrative support!.
Also remember, “not supported” doesn’t mean it’s not technically possible. It just means you’re on your own. I hope Proxmox and/or KVM support is added at some point in the future.
Yes, I’ll get support via a “not supported” appliance. Does it qualify as oximoron?
Network architecture
Lab sidecart environment
In the lab, we have an environment with the usual set of vendors & technology we work with. That setup includes a EVPN/VXLAN IP Fabric network with several clients being served. That network and the client platforms are expected to be reinstalled or rearranged at any point in time.
To provide some stable essential services, we’ve built a small parallel environment with some switches and PVE servers to run elements that must be available at all times:
- Remote access platform
- Authentication Services
- Security related tools
- Monitoring tools
- Firmware & Hardware related solutions
With this “sidecart” environment, no matter what is needed to be rearranged in the main environment, we’ll never lose administration capabilities.
For the scope of our discussion, the logical environment looks something like this:

Physically, the sidecart is just a pair of Cisco Nexus switches in stack to provide redudant L2 1GbE/10GbE services, and the OOBM network is a pair of Juniper EX switches providing 1GbE connectivity to switches and IPMI server boards.
Logically, the setup is quite involved and provides things like access control and network segmentation via OPNSense providing L3 & Filtering capabilities. We need users to authenticate via username/password + OTP, then we hit the Jump hosts using Guacamole:

My natural expectation was to deploy the call-home appliance next to other supporting appliances like Apstra or LibreNMS.

This is relevant for the next section.
Required network topology
Reviewing the deployment guide, you can see it mandates 3 networks interfaces:
| Interface | Supported IP Address | Role |
|---|---|---|
| Internal | IPv4 or IPv6 address | Used for connection to the switches to be monitored. Default route is also here. |
| External | IPv4 address only | Used to connect to Death Star (actual call-home) |
| Management | IPv4 address only | Used for captive portal access (web portal presented by appliance showing status) |
We could try to comply, and shoe-horn the appliance requirements to our environment:

It doesn’t make me confortable, VMs connected to different segments that should only interact through the firewall was not an option in our case.
Appliance analysis: Trial & Error
I did several runs of the deployment on KVM in a vacuum to validate what’s going on with the network setup and analyze what’s required to deploy it with a single interface.
I’ll spare you on the details, but the summary of the findings is:
First run: 3 networks with DHCP (internal + external + management)
“int” keeps the default route
“ext” has static routes to reach Death Star (JNI)
“cap” is used for captive portal (appliance status page)
The mentioned static routes (in case you’re curious, those segments are owned by AWS & DigitalOcean):
35.71.174.221 via <ext segment gateway> dev ext
35.83.44.146 via <ext segment gateway> dev ext
52.223.32.79 via <ext segment gateway> dev ext
54.149.98.110 via <ext segment gateway> dev ext
54.149.222.60 via <ext segment gateway> dev ext
68.183.248.21 via <ext segment gateway> dev ext
138.197.235.241 via <ext segment gateway> dev ext
First takeaway: We might need to massage the appliance to avoid installing the static routes, unless the static routes installation silently fails due to missing EXT interface.
The SSHD & Captive Portal services binding is not limited to any interface in particular.
root@ggc-lnx:~# lsof -n -sTCP:LISTEN -i :443
COMMAND     PID USER   FD   TYPE DEVICE SIZE/OFF NODE NAME
docker-pr 20982 root    4u  IPv4 106963      0t0  TCP *:https (LISTEN)
docker-pr 20994 root    4u  IPv6 107636      0t0  TCP *:https (LISTEN)
root@ggc-lnx:~# lsof -n -sTCP:LISTEN -i :22
COMMAND PID USER   FD   TYPE DEVICE SIZE/OFF NODE NAME
sshd    543 root    3u  IPv4  17619      0t0  TCP *:ssh (LISTEN)
sshd    543 root    4u  IPv6  17621      0t0  TCP *:ssh (LISTEN)
Second Takeaway: we don’t need to fiddle with service binding configuration, all services listen on all interfaces.
So the “don’t answer on EXT” behaviour should most probably come from firewall rules, except it doesn’t (no firewall rule exists to limit ingress SSH requests to a given inteface), the behaviour was a construction of my imagination and there’s not mention of it in the docs.
My ssh test was conducted from a client in the same subnet hosting the EXT interface. My wild guess is that any other remote client connection attempts coming from Internet should fail due to default gateway being installed on INT.
Anyhow kids, don’t place the appliance directly connected to Internet without incoming filters if you can avoid it.
Third Takeaway: we don’t need to mess with firewall configuration.
Fourth takeaway: The following screenshot depicts how a healthy appliance looks like.
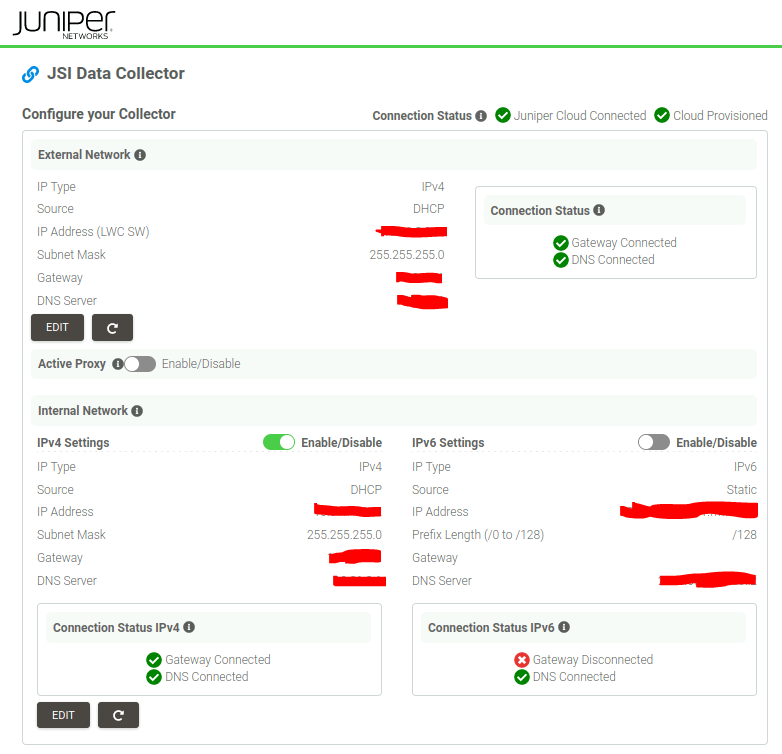
Second run: 1 network setup with DHCP (internal)
“int” keeps the default route, provides access to captive portal (appliance status page)
“ext” status is reported as failed
Fifth takeway: Even though the status page show a “Connection Status” errored for “External Network”, you can see that we still have “Juniper Cloud Connected” & “Cloud Provisioned”. My interpretation is that we have an error because there’s no EXT interface that can be setup, but it’s cosmetic since we have Internet access using INT with the default route.
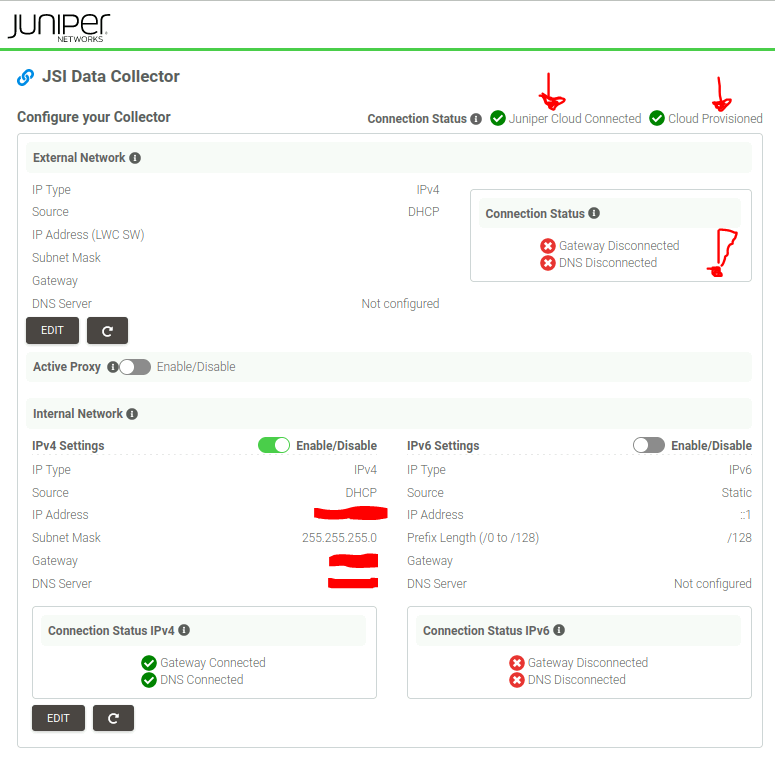
Also I can confirm that after checking the appliance at the OS level, there are no static routes. No adjustments are needed for a single interface deployment to connect to JSI.
The appliance
First administrative steps.
You have to request two things to your Juniper support team:
- Access to Juniper Support Insights to request the appliance
- Proper permissions to be setup to manage/use the appliance. We have a myriad of support accounts and something was not setup properly for my account in JSI.
How to request the appliance.
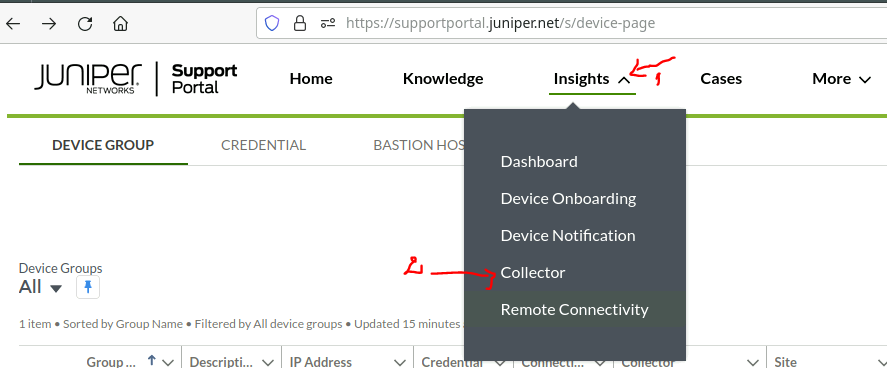
- Once you have the correct permissions set for your user, head to Juniper Support Portal
- Request the appliance via the web portal.

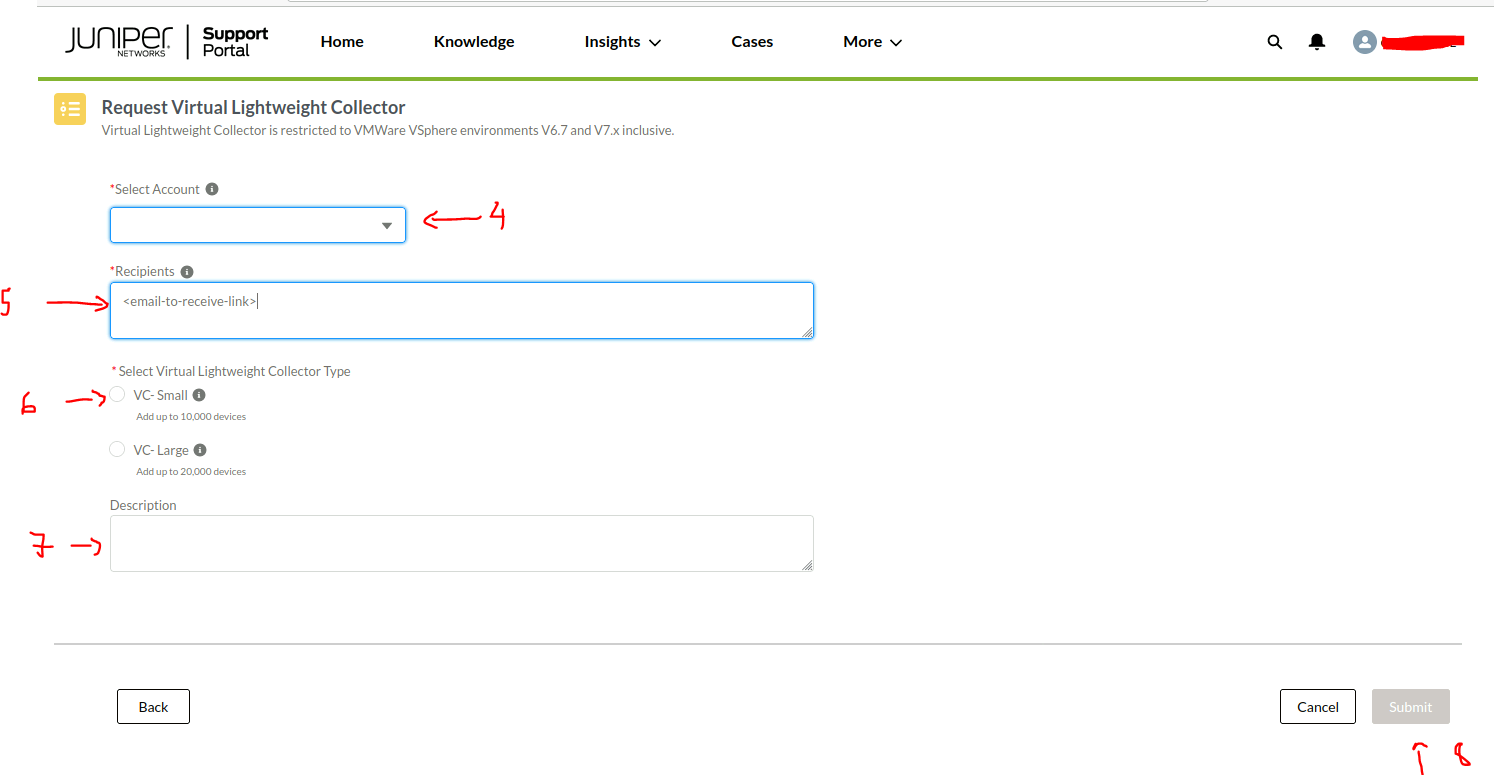
- In less than an hour, you should receive an email from do_not_reply@juniper.net with a link to download the appliance. The file is purged in 7 days, after which you would need to re-request the appliance.
Deployment
What are you receiving from Juniper?
When you download the appliance from the Juniper Support site, you will get a OVA file with a name similar to vLWC-${VERSION}-$(SERIAL_NUMBER).ova. In my case it was version 2.3.26.
An OVA file is basically a ZIP file with a VMDK disk image and a OVF file with the definition of the virtual machine to be created, including metadata and definition of what the user should input during rollout (we’ll skip de manifest file for the sake of this discussion).
The VMDK is apparently generic for all the customers, the OVF file includes the serial number specific to your deployment and needs to be incorporated during the instantiation/rollout.
Initial setup
With OVF customization available via vSphere + VMware Tools some parameters are passed to the VM at instantiation time, but that’s not supported by Proxmox VE. Proxmox VE + cloud-init could provide similar capabilities, but that’s not currently support by the vLWC appliance.

We would need to modify the original disk before importing it to the virtual machine. I’ll try to make as few modifications as possible.
- Required changes
- Network setup comes pre-configured in the appliance for DHCP, given we have DHCP for the sidecart environment, we’ll keep it as is. Other environments might need static addressing, out of scope for the time being.
- In any scenario, a mandatory change for the appliance would be to introduce the serial number for it to properly report to JSI. It requires two entries, a plain text entry which we’ll recover from the downloaded filename and an encrypted entry which we should recover from the OVF file.
- Nice to have changes
- We’ll adjust hostname for the sake of proper inventory. I’ve seen the logs of the appliance reporting home the hostname as product name & product version (Juniper guys, that’s not what a hostname is for), currently it doesn’t seem to affect functionality but will monitor and rollback if needed.
- Timezone. The appliance comes preset with UTC timezone, I’ll be adjusting that for our timezone. Will have to monitor and rollback if that affects something on the JSI side.
- QEMU Agent. Provides some integration to PVE to help in the VM management.
- Install my public key for root login, helps with troubleshooting (I know, I’m not supposed to use root for this appliance, as I’m not supposed to deploy it con PVE/KVM either 🙂)
Update 1: I was contacted by someone that seems to be part of the JSI operations team, he asked nicely to rollback the hostname change since it breaks things for them.
As a long shot, I’m adding this as additional request for the PLM.
Copy the OVA file to your PVE host (scp is your friend), and follow the procedure below.
- First, we need to take note of the serial number in the two representations we’ll need.
# prepare the working directory
mkdir -p import/juniper
cd import/juniper
# at this point, copy the OVA file via SCP.
# verify file existance
ls -l vLWC-2.3.26-<serial>.ova
-rw-r--r-- 1 ciro.iriarte ipausers 2466766848 Dec 19 17:01 vLWC-2.3.26-<serial>.ova
# We extract the content of the ZIP file
mkdir vLWC-2.3.26-<serial>
tar -C vLWC-2.3.26-<serial>/ -xf vLWC-2.3.26-<serial>.ova
cd vLWC-2.3.26-<serial>/

# Recover the un-encrypted serial number from the filename and take note of the output of this command
basename -s .ova $(ls -1 ~/import/juniper/*ova)| awk -F "-" '{ print $NF }'

# Recover the encrypted serial number from the OVF file and take note of the output of this command
grep --color serial_number ~/import/juniper/vLWC-2.3.26-<serial>/vLWC-2.3.26-<serial>.ovf |awk '{ print $6 }'|cut -f 2 -d '"'- We mount the system to modify it
# Make sure you start in the same directory we were working before. We move to the directory containing the disk image.
cd vLWC-2.3.26-<serial>/

# Convert from VMDK to RAW
qemu-img  convert vLWC-2.3.26-<serial>-disk1.vmdk vLWC-2.3.26-<serial>-disk1.raw

# Bind disk to loopback device
losetup -f -P vLWC-2.3.26-<serial>-disk1.raw
# Confirm binding
losetup -l

# Create a mount point for the vLWC system
mkdir -p /mnt/loop-root
# Mount the first partition
MYLOOP=$(losetup -l|grep vLWC | awk '{ print $1 }')
mount ${MYLOOP}p1 /mnt/loop-root/
mount -o bind /dev /mnt/loop-root/dev/
mount -o bind /proc /mnt/loop-root/proc/
chroot /mnt/loop-root/- As mentioned, we need to define the correct serial number. This would be the only mandatory change
# Define variables with serial data for your appliance
MYSERIAL="your plain text serial number"
MYSERIALENCRYPTED="your encrypted serial number"

# Set encrypted serial parameter
echo $(cat /opt/jsas/etc/vlwc-status.json | jq --arg val "$MYSERIALENCRYPTED" '.properties.serial_number = $val') > /opt/jsas/etc/vlwc-status.json
# Set plain text serial
echo -n "$MYSERIAL" > /home/jsas/nfxserialnum- Nice to have changes. You make them while still inside the chroot environment. You could add all the block to a script if you wish.
##
# QEMU agent
##

# Temporary adjust name resolution to allow package installation from Internet
MYDNS="x.y.z.w"
mv /etc/resolv.conf{,.orig}
echo "nameserver $MYDNS" > /etc/resolv.conf
# We install QEMU agent
apt install qemu-guest-agent
# Restore original DNS resolution config
mv /etc/resolv.conf{.orig,}

##
# Hostname. We don't do this anymore until Juniper releases an update that moves the appliance version validation from the hostname.
##
#NO# MYHOSTNAME="short.TLD"
# We backup original setup
#NO# cp -p /etc/hostname{,.orig}
# We define new hostname
#NO# echo $MYHOSTNAME > /etc/hostname

# In case you did change the hostname, the rollback would be:
# mv /etc/hostname{,.mine}
# mv /etc/hostname{.orig,}
# hostname $(cat /etc/hostname)

##
# Timezone
##

# Set your preferred timezone. You can get a list from timedatectl list-timezones
timedatectl set-timezone <Region>/<Country>

##
# SSH key for root
##

# Create the missing directory
mkdir ~/.ssh
# Add your public key to the trusted keys
YOURPUBKEY="key-type your-full-public-key-should-go-here key-alias"
echo "$YOURPUBKEY" >> ~/.ssh/authorized_keys- We unmount the image and unbind the device
# we exit the chroot
exit
# umount filesystems
umount /mnt/loop-root/dev /mnt/loop-root/proc /mnt/loop-root
# unbind device
losetup -d $MYLOOP
At this point, the disk image containes the setup required for your site/instance.
VM creation
For a vSphere supported solution, the OVF file is imported in vCloud Director or vCenter. It includes the VM definition (quantity & type of CPU, RAM, disks & network adapters).
We can’t use the OVF file for Proxmox VE, it should work, but in practice I found some formatting issues.
Login to your PVE machine via SSH and create a script to deploy the VM:
root@pve01:~/import/juniper# cat > import-vlwc.sh<<'EOF'
#!/bin/bash
# We set the bridge & the VLAN we need to integrate de VM to.
BRIDGE=vmbr0
VLAN=4089
# Storage destination for the appliance to live in
STORAGE=local-zfs
# Source disk image
DSK=vLWC-2.3.26-<serial>/vLWC-2.3.26-<serial>-disk1.raw

# We need the next VM ID available
NEWVM=$(pvesh get /cluster/nextid)
# Proper VM name
VMNAME=jsi-vlwc01.<my-TLD>

# We create the VM without disks. 6 vCPU + 16GB for up to 10k devices, most probably you can live with less resources.
qm create $NEWVM --name $VMNAME --bios seabios --machine q35 \
--numa 1 --sockets 1 --cores 6 \
--scsihw virtio-scsi-pci \
--memory 16384 \
--agent enabled=1

# We add the disk we have prepared, and attach it to the VM.
qm importdisk $NEWVM $DSK $STORAGE
qm set $NEWVM -scsi0 ${DISK} ${STORAGE}:vm-${NEWVM}-disk-0
# Boot device at BIOS
qm set $NEWVM --boot order=scsi0

# We add NIC with the correct VLAN mapping
qm set $NEWVM \
--net0 model=virtio,bridge=${BRIDGE},firewall=1,tag=${VLAN}

# We start the VM
qm start
EOF

# Allow the script to be executed
root@pve01:~/import/juniper# chmod +x import-vlwc.sh

# Create VM
root@pve01:~/import/juniper# ./import-vlwc.sh
After a couple of minutes, you should be able to visit the web captive portal view through the appliance FQDN (assuming you have proper DHCP+DNS integration) or its IP address.
Use the plain text serial number to login and look for “Juniper Cloud Connected” + “Cloud Provisioned” to make sure it’s online.
Wishlist for the PLM
In case a Juniper vLWC appliance Product Owner passes by :), I would recommend the following to be included in the backlog:
1- Support for a single interface setup
I totally get the 3 interfaces setup for a physical appliance that’s colocated with a lone MX960 on a remote site forgotten by God. You get:
- A “trusted” port that is either connected to a OOBM network serving several NEs or directly connected to the OOBM port on a lone router.
- An “outside” port that gives you access to Internet, probably comming from a NE in the ISP side of the house and shouln’t be trusted (no services like SSH listening).
- A “management” port that whould give access to an on-site engineer to the appliance, probably directly connected to his/her laptop.
My uneducated guess is the virtual appliance basically followed a “shoehorn-in-a-vm whatever we had in the physical appliance version” approach.
A virtual machine most probably will be deployed at a cozy TIER-something datacenter in a proper virtualization cluster with a very elaborated logical setup for management & monitoring, with L3 integrations to whatever destinations are required and services like filtering/segmentation outside of the appliance.
The ask would be: please support/allow a “single interface” setup as an alternative to the 3-port setup. Today it works as is, besides the EXT related errors in the status page.
2- Newer Linux distribution
As of vLWC-2.3.26, the appliance is based in Ubuntu 18.04.6 LTS which is already out of Standard Support after June 2023. Only Ubuntu Pro support subscribers will get minimal patch releases, and after quick verification I can tell that’s not available on the deployed appliance (maybe even sporting a buggy openssl version?):
root@ggc-lnx:~# pro status
Failed to access URL: https://contracts.canonical.com/v1/resources?architecture=amd64&kernel=4.15.0-212-generic&series=bionic&virt=kvm
Cannot verify certificate of server
Please check your openssl configuration.
Old Linux distributions instances and the security implications for a given environment is a threshed topic. I would just summarize the ask as: an OS refresh is due and Ubuntu 22.04.3 LTS is at your disposal. No, “we’ll eventually re-package a new version of the appliance with patches applied and you should re-deploy” is not acceptable
3- Support for PVE/KVM
Not all the Juniper shops run VMware vSphere on the compute side, and if they do, it may not always be the choice for each and every deployment. Even though I welcome the work done on the OVF file preparation to automate the initial setup, I strongly recommend your team invests some time implementing support for cloud-init in the initial setup script, which is the de facto standard to deploy virtual appliance in cloud environments (KVM on prem, vSphere, AWS, Azure, etc).
Some low hanging fruits at your disposal:
- VirtIO network interface drivers are already available in the appliance (recommended for KVM/QEMU, not limited to VMXNET3). Used in this deployment.
- QEMU agent can easily be installed from Ubuntu repos pre-setup in the appliance (nice to have, covers some functionality of VMware Tools for KVM/QEMU). Used in this deployment.
- cloud-init agent can be easily installed from Ubuntu repos pre-setup in the appliance. Not used in this deployment.
4- Allow for hostname change
Due to some arguable requirements/conventions we have, we need to assign a proper hostname to the VM. It seems to be used for appliance versioning as noted a little early in the article.
- We match the VM name & OS hostname for inventory purposes (several tools data consolidation & crosscheck).
- Part of SOX controls recommend proper hostname naming convention to be enforced.
- DHCP registration updates DNS records, having more than one appliance deployed messes up this automated integration.
My strong recomendation is that you move appliance version reporting to a proper metadata entry somewhere else, and let hostname be a hostname.