Setting up JunOS devices for Juniper Support Insights
Intro
Going back to the “supported” track, after deploying vLWC you need to prepare the devices being monitored. I can’t seem to find a concise guide to properly setup network elements for JSI, so I’m sharing my notes notes after a long trial & error exercise.
After reading the JSI FAQ, my interpretation is that we’ll need to at each network element:
- NETCONF-SSH enabled
- SFTP enabled
- A process user account dedicated to JSI/vLWC with sufficient permissions (principle of least privilege)
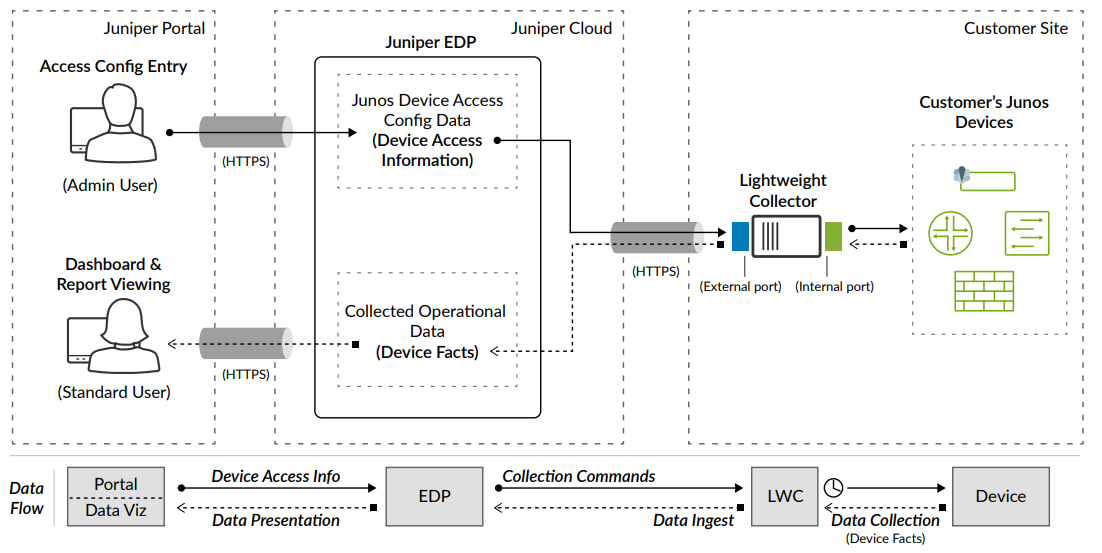
An overview of how data collection works can be found in this flyer
Pre-requirements
SSH key pair
We need a pair of public/private SSH keys for the user. You can create it on any Linux machine.
Note: Down the road I found that JunOS won’t accept DSA keys but RSA only.
ciro.iriarte@jhost01:~> ssh-keygen -t rsa -C "JSI process user" -f ~/.ssh/id_rsa-jsi
Generating public/private rsa key pair.
Enter passphrase (empty for no passphrase): <-- make sure you input a passphrase
Enter same passphrase again:
Your identification has been saved in /home/ciro.iriarte/.ssh/id_rsa-jsi
Your public key has been saved in /home/ciro.iriarte/.ssh/id_rsa-jsi.pub
The key fingerprint is:
SHA256:vMRG09Sd7BR1Q5P7B+9RakR2thSR3Md3bBOtYmm+VVc JSI process user
The key's randomart image is:
+---[RSA 3072]----+
|          .. o+&@|
|         o  . B*E|
|        o .  *.=O|
|       + .  = =o+|
|        S  + o =+|
|       o .  . +.+|
|        .    + .o|
|            .   .|
|                 |
+----[SHA256]-----+
You’ll use:
- the contents of ~/.ssh/id_rsa-jsi.pub to setup access in the switches
- the contents of ~/.ssh/id_rsa-jsi + the passphrase will be used in the JSI portal to define the access credentials.
Actual commands that should be permitted.
From the FAQ mentioned before we get that the commands the appliance will execute are:
file list detail
show bgp summary
show chassis alarms
show chassis fpc
show chassis hardware extensive
show chassis routing-engine
show interfaces descriptions
show interfaces terse
show isis adjacency
show ospf neighbor
show rsvp neighbor
show system buffers
show system commit
show system core-dumps
show system license
show system uptime
show version
show vrrp detail
request support information
sftp
Apstra managed switches
NETCONF
NETCONF is already an Apstra requirement, so you should have that already covered. To quickly validate, you can verify the default port is listening for connection requests:
ciro.iriarte@jhost01:~> nmap -p 830 ipf01-lf01.<TLD>
Starting Nmap 7.92 ( https://nmap.org ) at 2023-12-27 14:12 EST
Nmap scan report for ipf01-lf01.<TLD> (x.y.z.w)
Host is up (0.0012s latency).

PORT    STATE SERVICE
830/tcp open  netconf-ssh

Nmap done: 1 IP address (1 host up) scanned in 6.58 seconds
SFTP
Not sure if SFTP is a requirement for Apstra, but found out that all the switches in the Apstra environment had the SFTP subsystem already enabled. If that’s not your case, a configlet for enabling it is all you need.
Process user
In this environment we don’t have TACACS+ (it’s 2023 Juniper team, can we please get LDAP already?). For practical purposes, we’ll use Apstra configlets to create a process users from Apstra.
Configlet creation
- Reach the configlet creation page.

- Fill in the basic configlet data
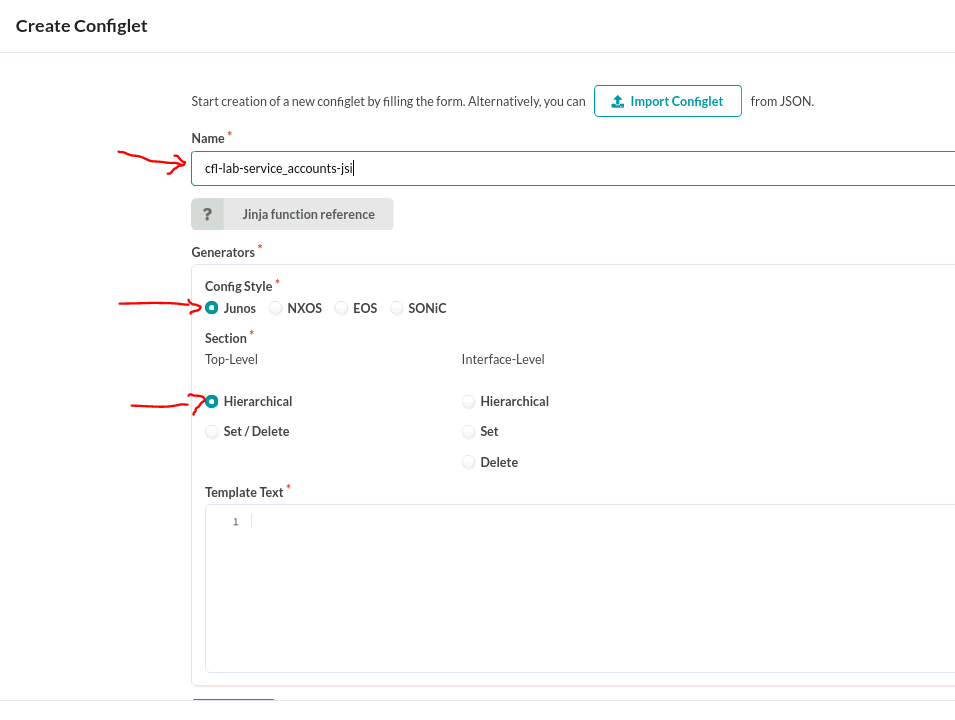
- Paste the following content in the body, and click “Create”
system {
 login {
     class jsi-class {
         permissions view-configuration;
         allow-commands "(file list detail)|(show bgp summary)|(show chassis alarms)|(show chassis fpc)|(show chassis hardware extensive)|(show chassis routing-engine)|(show interfaces descriptions)|(show interfaces terse)|(show isis adjacency)|(show ospf neighbor)|(show rsvp neighbor)|(show system buffers)|(show system commit)|(show system core-dumps)|(show system license)|(show system uptime)|(show version)|(show vrrp detail)|(request support information)|(sftp)";
         deny-commands "(clear)|(file)|(file show)|(help)|(load)|(monitor)|(op)|(request)|(save)|(set)|(start)|(test)";
         deny-configuration all;
     }
     user svcjsi {
         full-name "JSI process user";
         uid 2007;
         class jsi-class;
         authentication {
             ssh-rsa "ssh-rsa your-key-super-long-string JSI process user";
         }
     }
 }
}
Note: Make sure UID is unique in your environment. I saw random posts/notes/documentation referencing UID 2000 (for other unrelated implementations), I was super clever changing that to 2001 so I would avoid clashing with config everybody else could be copying/pasting, it turns out whoever implemented Apstra had the same thought.
Importing Configlet to blueprint
To actually apply the previously created configlet to your network elements, you must:
- Import configlet to the blueprint, assigning it to the devices of interest. In my case, that would be all the spines and leaf switches.
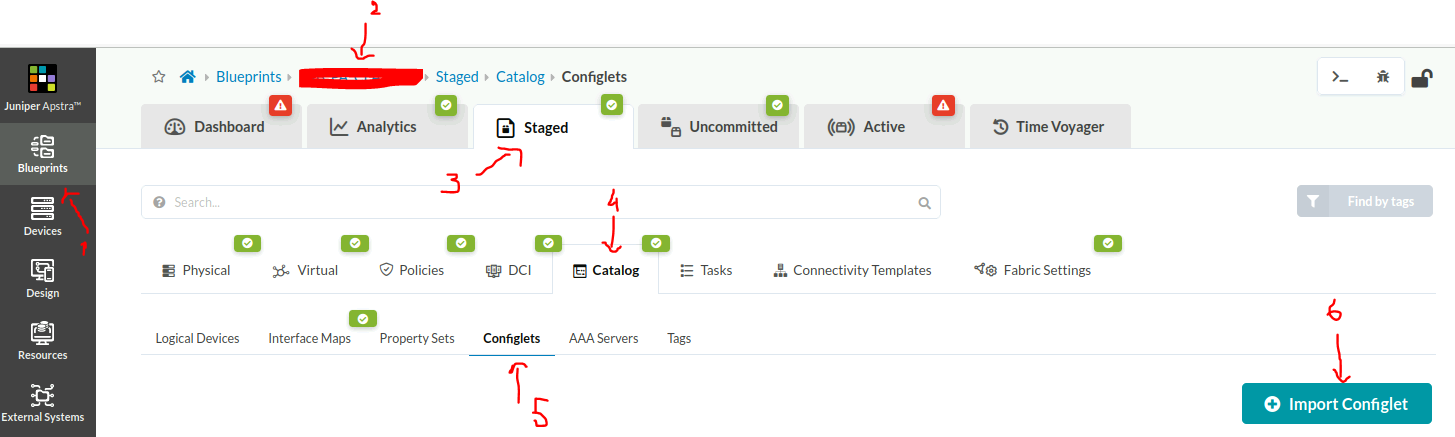
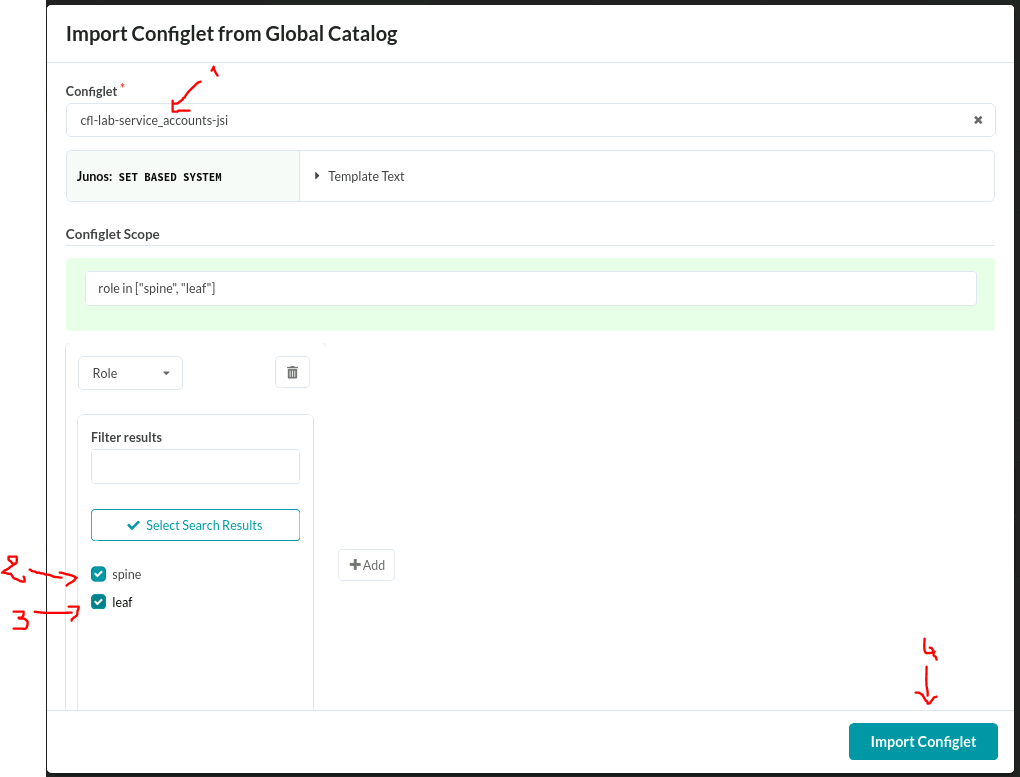
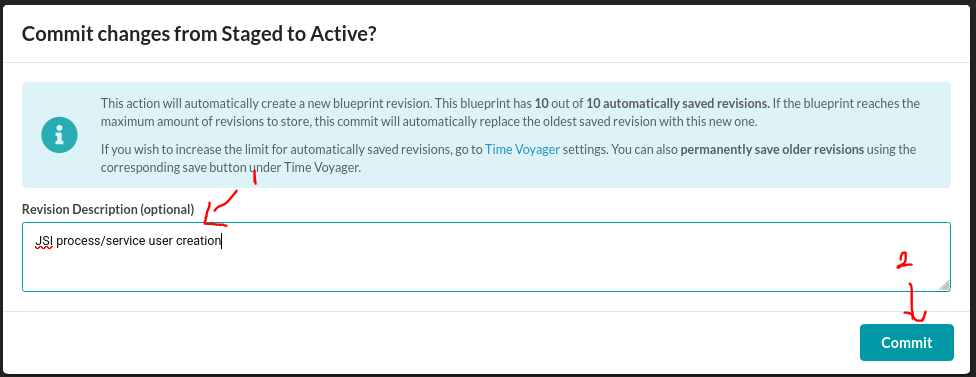
- Commit the configuration to be pushed to the devices.

Standalone switches
These switches aren’t managed by Apstra or any other manager, also there’s no TACACS+ or similar authentication or RBAC services (did I mention I would love to have LDAP available to reuse already existing authentication services?). Given they are only 2, manual & local setup should not be a problem.
Connect to the switch with an admin user, in edit mode.
NETCONF
We enable the service. Cool automation kids recommend the last 3 commands for interoperability, but given vLWC is a closed tool by Juniper for JunOS it might expect the less standard non compliant default configuration. Something to monitor and validate after adding switches to JSI.
set system services netconf ssh
set system services netconf rfc-compliant
set system services netconf yang-compliant
set system services netconf hello-message yang-module-capabilities advertise-standard-yang-modules
SFTP
SFTP subssystem needs to be enabled, seems to be disabled by default.
set system services ssh sftp-server
Process user
- We create the user class with the required access level
set system login class jsi-class permissions view-configuration set system login class jsi-class allow-commands "(file list detail)|(show bgp summary)|(show chassis alarms)|(show chassis fpc)|(show chassis hardware extensive)|(show chassis routing-engine)|(show interfaces descriptions)|(show interfaces terse)|(show isis adjacency)|(show ospf neighbor)|(show rsvp neighbor)|(show system buffers)|(show system commit)|(show system core-dumps)|(show system license)|(show system uptime)|(show version)|(show vrrp detail)|(request support information)|(sftp)" set system login class jsi-class deny-commands "(clear)|(file)|(file show)|(help)|(load)|(monitor)|(op)|(request)|(save)|(set)|(start)|(test)" set system login class jsi-class deny-configuration all - We create the user, using the previously created class. Use your public key not mine!
set system login user svcjsi class jsi-class
set system login user svcjsi full-name "JSI process user"
set system login user svcjsi uid 2007
set system login user svcjsi authentication ssh-rsa "ssh-rsa your-key-super-long-string JSI process user"
Final commit
- Commit the configuration (both service & user)
commit
Testing NETCONF by hand
Before going through the whole JSI apparatus, my recommendation would be to run a basic local test with the user we have created.
Login to a Linux machine with access to the switches and the private key for the user we have created, and try to connect to the switch using NETCONF
# We start the ssh key agent
eval $(ssh-agent)

# We add the key to the agent, the command will prompt for the key passphrase
ssh-add ~/.ssh/id_rsa-jsi

# We try a connection on default port
MYSWITCH=host.tld
ssh svcjsi@$MYSWITCH -p 830 -s netconf
Answer should be similar to
<!-- No zombies were killed during the creation of this user interface -->
<!-- user svcjsi, class j-jsi-class -->
<nc:hello xmlns:nc="urn:ietf:params:xml:ns:netconf:base:1.0">
<nc:capabilities>
<nc:capability>urn:ietf:params:netconf:base:1.0</nc:capability>
<nc:capability>urn:ietf:params:netconf:capability:candidate:1.0</nc:capability>
<nc:capability>urn:ietf:params:netconf:capability:confirmed-commit:1.0</nc:capability>
<nc:capability>urn:ietf:params:netconf:capability:validate:1.0</nc:capability>
<nc:capability>urn:ietf:params:netconf:capability:url:1.0?scheme=http,ftp,file</nc:capability>
<nc:capability>urn:ietf:params:xml:ns:netconf:base:1.0?module=ietf-netconf&revision=2011-06-01</nc:capability>
<nc:capability>urn:ietf:params:xml:ns:netconf:capability:candidate:1.0</nc:capability>
<nc:capability>urn:ietf:params:xml:ns:netconf:capability:confirmed-commit:1.0</nc:capability>
<nc:capability>urn:ietf:params:xml:ns:netconf:capability:validate:1.0</nc:capability>
<nc:capability>urn:ietf:params:xml:ns:netconf:capability:url:1.0?scheme=http,ftp,file</nc:capability>
<nc:capability>urn:ietf:params:xml:ns:yang:ietf-inet-types?module=ietf-inet-types&revision=2013-07-15</nc:capability>
<nc:capability>urn:ietf:params:xml:ns:yang:ietf-netconf-monitoring</nc:capability>
<nc:capability>http://xml.juniper.net/netconf/junos/1.0</nc:capability>
<nc:capability>http://xml.juniper.net/dmi/system/1.0</nc:capability>
</nc:capabilities>
<nc:session-id>65596</nc:session-id>
</nc:hello>
]]>]]>Is that it?
Well, it should be all for the NE configuration. Now you should be able to login to the JSI portal an onboard devices (Juniper guys, please add support for FQDN in the form besides IP addresses).
Have fun!
More reference documents
In case you’re still reading, these are some documents & notes I’ve reviewed in the process.
- Establish an SSH Connection for a NETCONF Session
- Managing Juniped devices with SSH and NETCONF
- Example: Configuring User Permissions with Access Privileges for Operational Mode Commands
- Connect to the NETCONF Server Using SSH
- Technical note on using SSH keys with JunOS
Known errors
JSI reporting wrong credentials
During my tests, I found that JSI web portal didn’t handle credential updates. You could save the changes, you can see the new information in the web portal but it seems it doesn’t reach their backend. I had to delete/recreate the credentials in the web portal for them to work.
NETCONF reported as not configured
During my tests, I could confirm manually that NETCONF was properly setup, but JSI kept reporting:
The NETCONF subsystem is not enabled on the devices with the listed IP addresses. Please check and correct these entries
The JSI team reported there was a timer that didn’t allow the NETCONF dialogue to finish properly. This was fixed on their end expanding the timeout configuration, not sure if this is a platform wide parameter or you should request this for your specific nodes/sites/accounts.
You can reference Juniper SR # 2023-1228-038580.